
The Prism Dress is our newest Verb pattern but has quickly become one of our favorites. We love the versatility of the design, an easy to wear raglan pullover that can be sewn many ways: from an everyday uniform in hardwearing denim chambray, to something more individual, with added color-blocked fabric placement of the split sleeves or body panels. Since this pattern is so suited to personalizing and adapting (we’ve seen some lovely Prism shirts made), we wanted to work up a little tutorial this Slow Fashion October to inspire you to add your own unique touch to this pattern!
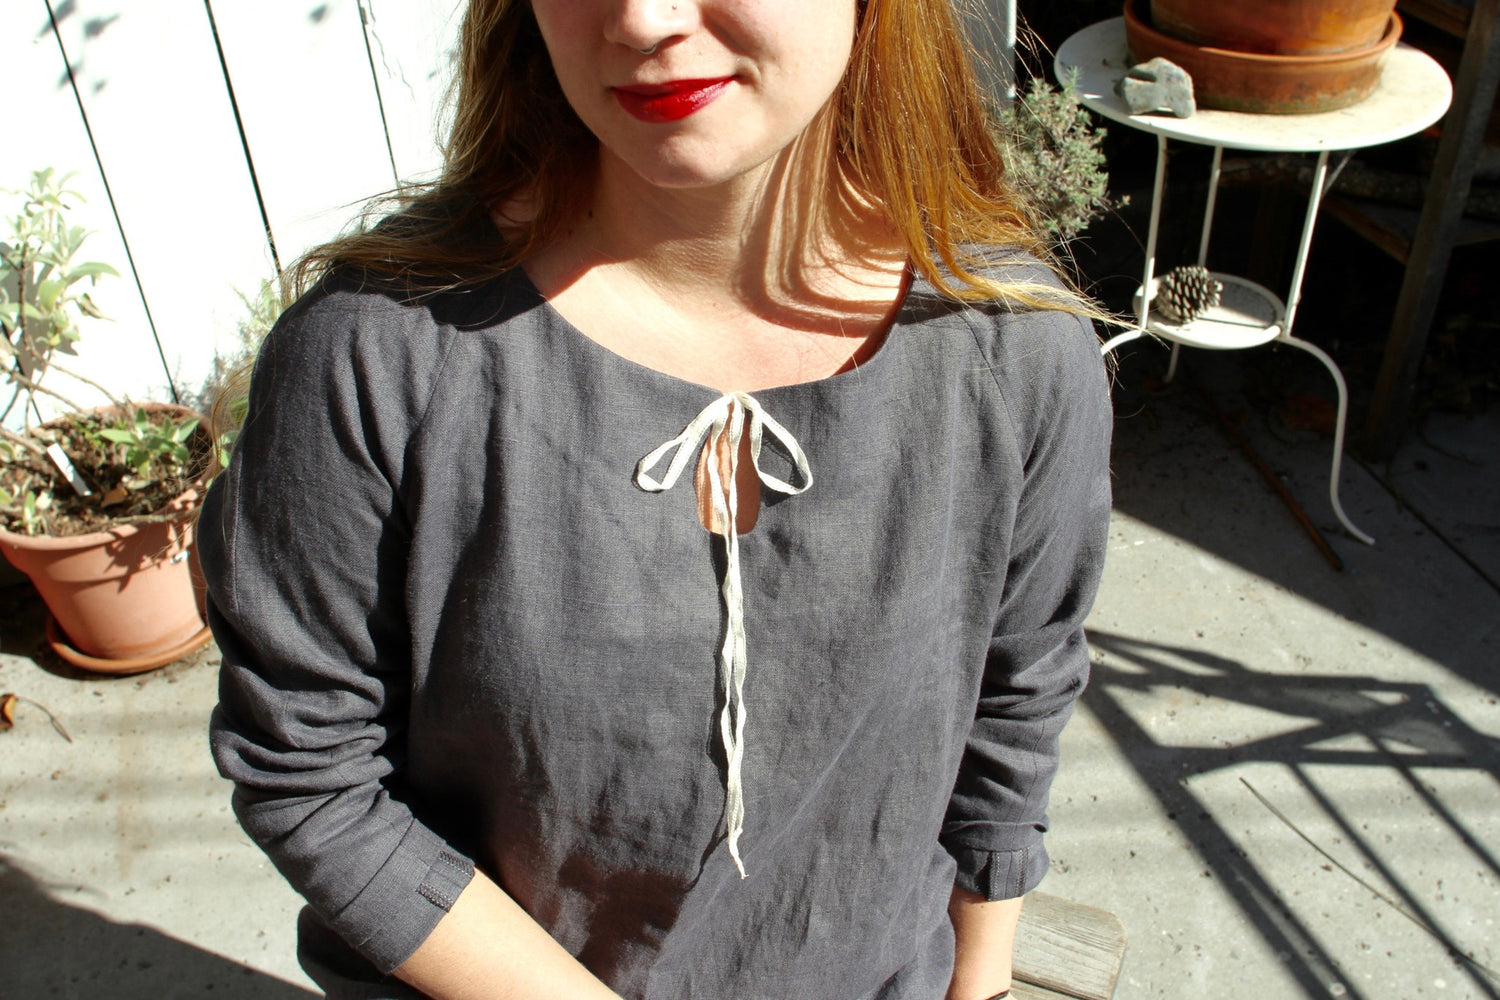
We thought the added accent of a keyhole cutout would be a fun, new way to style the Prism Dress. The keyhole cutout can work either on the front of the dress or the back, and is an easy addition as it will fit in seamlessly with all sizes or other modifications! Tasa Gleason, Verb’s garment sewing instructor and the master pattern drafter who helped us create the Prism Dress, will show you how easy it is to modify the paper pattern pieces to create the Prism keyhole modification, and add this fun design element to your dress.
MATERIALS:
+ A Verb for Keeping Warm Prism Dress Pattern
+ Tracing paper
+ Merchant & Mills Washed Linen in color Silt Grey
+ Thread to match
TOOLS:
+ Paper scissors
+ Pencil
+ Eraser
+ Ruler
+ Sewing Shears
+ Sewing Machine
PROCESS:
To begin, determine how long and how wide you’d like the teardrop shape to be. The keyhole can be placed on either the front or back of the garment and the process is the same for both placements. We recommend taking a flexible measuring tape, and while looking in a mirror, determine the depth and width you prefer. Our keyhole finishes 3 inches down from neckline and is 1 ½ inches wide, with the widest point ½ inch up from the bottom, but you can find a size and shape that works best for you!
DRESS PATTERN MODIFICATION:
Trace the dress panel (front or back) for your size from your Prism Dress pattern. Copying the full width of the pattern (rather than on the fold) will ensure the most accurate proportion of the keyhole. Using a ruler, mark the seam allowance (½ inch) all the way around the inside of the curve of the neckline onto the pattern piece; we have marked our seam allowance line with a broken red line. Using the depth and width measurements you’ve chosen for your keyhole, measure down from the neckline seam allowance and mark your dimensions.

Now draw your keyhole shape onto the pattern making sure to leave a half inch wide opening at the top of the keyhole. Start at the center top and connect the dots! This will be the finished size for your keyhole.

Your keyhole will have ¼ inch seam allowance. Measure and mark in this line with your clear ruler, ours is marked in blue.

Fold the paper in half at center front and then cut out keyhole along the blue cutting line, leaving the top point connected at the neckline. Folding the pattern in half to cut out the keyhole will insure that it is symmetrical. At this point you should check and make sure that you like the shape of your keyhole. Cut out the rest of the dress pattern piece.

On to the next step! You will also need to make a new pattern piece for the facing of your dress.
FACING PATTERN MODIFICATION:
Trace off onto a new piece of pattern paper the original facing piece from your Prism pattern, and cut it out. On the dress panel pattern paper you’ve been modifying, overlay the facing piece and draw in the facing line, following along the curve of the neckline. Measure 2 inches below the finished bottom of keyhole shape and hand draw a curving line that connects the facing line to the new keyhole shaped facing line. This will give you a guideline for transferring these shapes onto your new keyhole facing pattern piece.

Overlay a new piece of tracing paper and trace off the new facing shape and keyhole shape from modified dress pattern piece.
Place the original facing pattern piece on this new facing pattern paper and trace. Your facing pattern piece will extend further along the neckline than your dress pattern piece because it includes the tops of the raglan sleeves. Don’t forget to add a new grainline!

Fold your new keyhole facing paper at center front, to be sure that both sides are symmetrical, and then cut out new keyhole facing pattern piece.
Now that you have your two new, modified pattern pieces you are ready to lay down the pattern paper and start cutting into your fabric!

We recommend cutting your keyhole fabric piece, whether it’s the front or the back panel, flat and not on the fold. You may have to adjust the layout for all your pattern pieces to accommodate this. Cut the rest of your fabric according to the cutting directions found in the Prism Dress pattern booklet.
SEWING INSTRUCTIONS:
Sew your modified Prism dress as directed until the point at which you attach the facing to the neckline of the dress. At this point you will sew the main neckline with ½ inch seam allowance as directed, and then sew the keyhole with ¼ inch seam allowance. It is easiest to do these steps separately as you will be adding in the ties on this step. Note: if you wish you can also finish the top of the keyhole with a button and loop, or by gently hand stitching the points together at the ends.
To make the ties we have used a small amount of vintage cotton ribbon, you could make your own ties out of your dress fabric or use any kind of cord that you wish. Cut a generous length (you can always shorten them later) and tie a small knot in both ends. Sew your neckline with ½ inch seam allowance, then slip the ties in at the top of the keyhole with one knot just on the seam allowance side of the sewing line and the main part of the tie laying on what will be the right side of your Prism dress. Make sure the tie is pushed up close to the seam that you just sewed around the main neckline. Do the same with other tie. Now sew around the keyhole detail with your ¼ inch seam allowance. Finish your dress as directed.

In the picture showing the inside of the finished dress you can see that we have done a little hand under stitching on the facing to keep it from showing and cross stitched down the bottom of the facing piece to keep it from flipping up. These are optional and can always be added later!

Enjoy your modified Prism Dress!