• Cart: 0 items
  • Home
  • Shop Online
    • Journeys in Natural Dyeing Pop-Up Shop
    • New!
    • Books, DVDs, + Magazines
    • Classes + Special Events
    • Clubs
    • Embroidery
    • Fabric
    • Fiber
    • Gifts + Gift Certificate
    • Kits
    • Natural Dyeing
    • Sewing Patterns
    • Tools / Project Bags
    • Yarn
  • Holiday Gifts
  • Ideology
    • About Us
    • Studio/Process
    • Mission Statement
    • Community Guidelines
  • Podcast
  • Blog

Building a Compost Floor for the Japanese Indigo Process: Part 1

Posted by Kristine Vejar on January 13, 2012 4 Comments

This weekend, I traveled to Marin County, just north of here, to meet with master indigo dyer, Rowland Ricketts. He taught us about the particular species of indigo plant he grows, the process he uses to compost his indigo, thus making it into a dye, and how to create a fermentation vat to use the indigo as a dye. One of the important points Rowland makes is that the cultivation of the indigo plant and the creation of indigo vats is mainly done in parts of the world with a sub-tropical or tropical climate. As indigo dyers in the U.S. / Western Hemisphere, our climate is not as consistently humid and hot. Also, as in many forms of textile production, people who make textiles that we honor and would like to preserve, use materials inherent to their lives and culture. So we must look in our own communities, and world around us, to see if and what we can gather to accomplish the same means. This was definitely part of our exploration as we had to use some materials a bit different than in Japan, specifically the clay.

In this first part of my series on Rowland's style of indigo cultivation and dyeing, I am going to describe the root material, indigo, and give you an overall sense of the process.

First, we take the indigo plant, which has many different species. The particular species Roland grows is Polygonum tinctorium. This species has responded favorably to our climate. Then the indigo is harvested (possible 2-3 times in a single season), and left out to dry. 

In the meantime, a structure must be built to house the composting portion of the indigo process. This is what we started to construct on Tuesday.


The Nedoko built by John of the Marin Carbon Project .


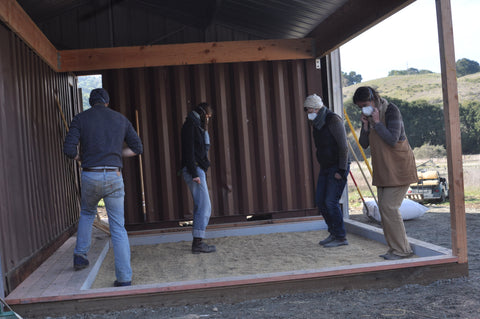
Leveling of base floor: rock. 


Applying a layer of sand.


Rowland demonstrates the Japanese method of tamping.


Power in numbers, we tamp together using our feet.


Rowland tests for balance and accuracy.


Next layer: rice hulls. 


The tamping continues.


More sand is carefully added - don't disturb the rice hulls.


Rowland adds the first of many bags of clay.


And we tamp.


The floor is finally level. Rowland wets the surface.

The next day, Rowland and Rebecca continued to work. The clay floor needs to have a center which is slightly higher than the edges. 

Once the floor is finished and set, dried indigo leaves (440 lbs) will be placed upon the floor and covered with straw mats. The indigo will begin decomposing. The process in which we layered the materials will allow the indigo to breathe just enough so it does not rot. The rice hulls are warm and aid to the composting process. After 100 days, the composted indigo will be ready to be added to the dyepot. In indigo dyeing, for the indigo to adhere to the fiber, the oxygen must be removed from the pot (vat). Currently, we do this at Verb chemically (through the addition of either thiourea dioxide or sodium hydro-sulphite), we would like to make the move towards doing indigo without these chemicals. In order to do this, we must start a fermentation vat in which we raise bacteria which will eat the oxygen molecule. The superb thing about the compost indigo is that it contains the bacteria necessary to reduce the indigo vat. If able to use composted indigo, we would be able to change at least a portion of how we are currently dyeing with indigo. This new process would allow us to have a healthier way - to both us and the environment. And, it would allow us to support indigo farmers, such as Rowland and Rebecca. In the meantime, we are growing Polygonum tinctorium at Verb. If you would like to get involved get in touch, we could use your help with the growing.

Part 2 of this article will be about winnowing indigo seed. 

Hopefully, there will be a part 3 to this story, in which we start either processing our own indigo or begin the process of creating our fermentation vats.


Previous Post Next Post

Comments (4 Comments)

Posted by Michelle on January 16, 2012

Thank you for your informative description of the Indigo process.
The philosophy about drawing on your local community and resources is meaningful today. I enjoy that fibre artists are becoming more aware of local natural resources.. The dyes that i draw and coax from eucalyptus and coreopsis weeds are most suitable to the cool climes of the mountain region in which i live. I would definitely have trouble growing indigo! Enjoy your harvest!

Posted by Birdsong on January 13, 2012

Thanks for such a thorough and detailed description of what we all accomplished together! I posted more photos on my Facebook site (Natures Cauldron), so please feel free to tag yourselves and share further. I am so glad that we can all collaborate on making composted indigo happen in our region, and intend to take next summer’s plants to be composted, as well as start a vat here in the foothills.

Posted by Judy on January 13, 2012

This structure is a permanent structure?

Posted by Gwen on January 13, 2012

Wow! What a huge undertaking. I’m very impressed by your planning & committing to the step you feel is best for Verb. This is very inspiring environmentally, business wise, and personally. Great post! Thanks for taking the time to share with us!!!

Post Comment


How much is:
Answer:*

Recent Blog Posts

  • Changing Pioneer to Horizon
  • Posted on August 21, 2019
  • In the Dye Studio: AVFKW Gather Yarn
  • Posted on October 18, 2018
  • Pro-Verbial Club: Nancy Marchant
  • Posted on October 15, 2018
  • AVFKW Dye Day Cocktail Recipe with Thea Colman
  • Posted on August 19, 2018
  • In the Dye Studio: The Indigo + Shibori Dye Kit
  • Posted on August 12, 2018
  • In the Dye Studio: How to Host a Natural Dyeing Party (Part 2)
  • Posted on August 07, 2018
  • In the Dye Studio: How to Host a Natural Dyeing Party (Part 1)
  • Posted on August 06, 2018
  • Stitch Exchange: The Twigs Sweater + AVFKW Flock Yarn
  • Posted on May 10, 2018
  • Stitch Exchange: Papa Sweater + Horizon Yarn
  • Posted on March 15, 2018
  • Sewing 101: Make a Tote Bag
  • Posted on December 10, 2017

Blog Tags

  • alabama chanin
  • american made
  • avfkw
  • boro
  • brooklyn tweed
  • California Wool Project
  • design by romi
  • dye garden
  • dyeing
  • Fabric
  • felting
  • Flock
  • Flowers at My Fingertips Sewing Kit
  • foraging
  • In the Dye Studio
  • indigo
  • knitting
  • Montana
  • mushroom
  • natural dyeing
  • northwoods hat
  • oakland
  • organic
  • Out & About
  • pattern
  • Pressed Seam
  • pro-verbial club
  • proverbial
  • quilting
  • quince & co
  • sandstone shawl
  • sashiko
  • Seam Allowance
  • sewing
  • sock hop
  • special event
  • spinning
  • Stitch Exchange
  • stitches west
  • stowe bag
  • Tasa
  • textile byways
  • The Field and Forest Dress
  • the modern natual dyer work-along
  • the modern natural dyer
  • up and coming
  • visible mending
  • wanderlust bag
  • weaving
  • wool
  • writing
  • yarn

Newsletter Shipping + Curbside Pickup Add-to-Order Special Discounts Return Policies Press Stockists

6328 San Pablo Avenue, Oakland, California 94608
510.595.8372 - info@averbforkeepingwarm.com
Tues - Sat 11am - 3pm, Sun & Mon Closed

Copyright © 2021 A Verb for Keeping Warm.