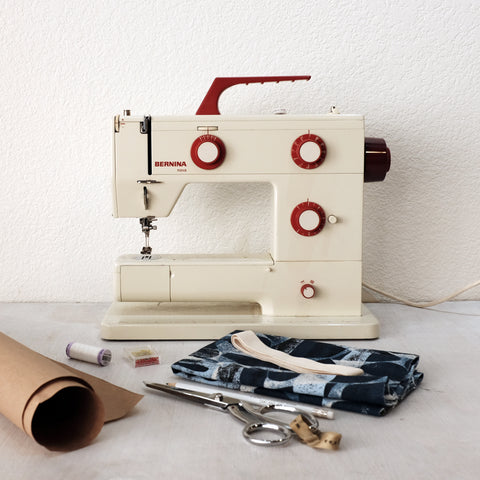
Fabric. It comes in a myriad of colors, prints, and textures. But how to use it? The first step is to learn to sew. Sure, you could purchase a piece of fabric at Verb, leave the edges raw, and make an impromptu tablecloth. Though by learning to sew, you can finish the edges of your tablecloth - and even more intriguing - make shapes! By learning to sew, you can use truly stunning fabrics, those whose quality are difficult to find in most retail shops, and begin to make truly unique goods for your home, yourself, and your friends!
At Verb, those desiring to learn to sew, take a class named Sewing 101: Make a Tote Bag. Sewing a tote bag as your first project is great because it is highly useful and through the steps of learning how to sew one, you can learn the basics of sewing. Though we love when people come to class, and feel we can convey a lot more information quickly through that format, as well as give you advice unique to your skill set and sewing machine, we realize that not everyone's schedule lines up with ours, or you might find yourself located too far away. So we have decided to create a tutorial for you to teach you how to sew a tote bag. Plus, we have tote bag kits for you to make it easy for you to start the process. So let's start sewing!
Sewing 101: Learn to Sew a Tote Bag
FINISHED DIMENSIONS
MATERIALS
- ½ yard of lightweight canvas fabric
- 1 ½ yards of twill tape
- 1 spool of thread
TOOLS - REQUIRED
- Paper - at least 14" wide X 16" long
- Pencil
- Paper scissors
- Fabric Scissors (When sewing, you will need sharp scissors in order to cut fabric. Using scissors on paper dulls them quickly. It is best to have a pair of scissors reserved for cutting fabric only.)
- Pins (preferably glass-headed, because they do not melt during pressing)
- Ruler (preferably clear plastic)
- Sewing machine
- Iron and ironing board
TOOLS - OPTIONAL - though not required to complete this project, these tools are very helpful.
- Stitch gauge (helpful when measuring the seam allowance)
- Marking pencil
- Seam ripper
- Pin cushion
- Pattern paper
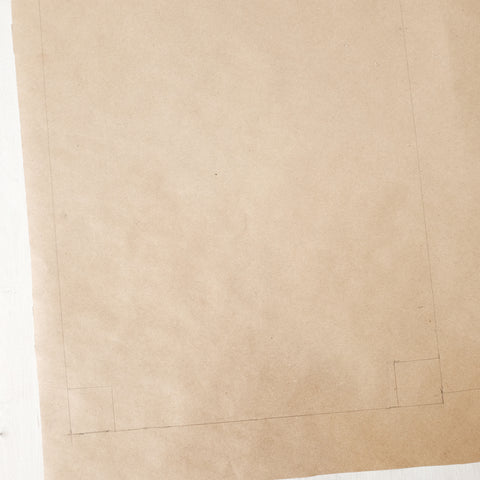
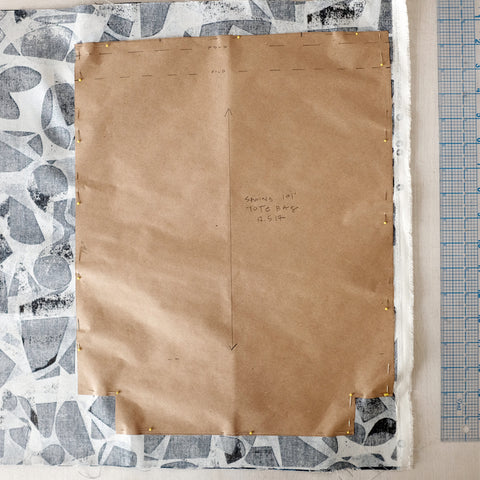
We are going to start by making a paper pattern. Take a piece of paper and using your ruler draw a 14" wide by 16" long rectangle. (Don't look at my measurements in this photo! ;) I decided a slightly larger bag was better. Which by the way, feel free to make your bag a bit larger or smaller. The same general sewing instructions will apply). The 14" wide line makes the top and bottom of the tote bag pattern. The 16" long side of the rectangle make the sides of the tote bag pattern.

Next, along the bottom left-hand and right-hand corners, draw a 1 1/2" square.

Once you have drawn squares on both lower corners, your paper pattern will look like this:
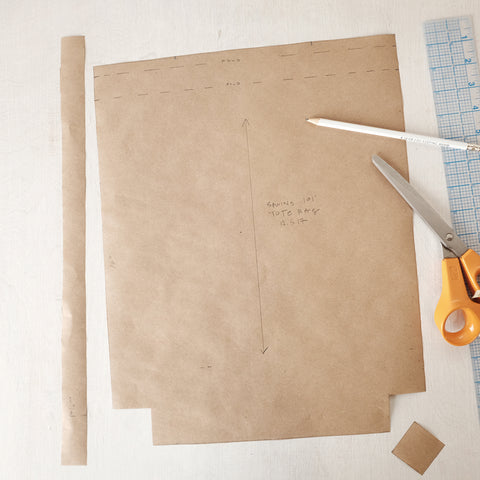
Now, you will add a few marks and lines to the top of the pattern piece. These marks will help you finish the tote bag when the time comes.
Along the top line of the pattern, measure 3 1/4" from the left side and make a mark. Do the same on the right-top side. These marks will communicate where to add the straps of your tote bag.
Draw two dotted lines, parallel to the top of the bag: measure 1/2" from the top, and draw the first dotted line. Then, do the same, 1 1/2" from the top of the pattern.

Using your paper scissors, cut out the paper pattern. Mark the pattern piece with the project name: Sewing 101: Tote Bag, the date, and an arrow as indicated in the photo below. This indicates the grainline.
Let's talk fabric. Take out your piece of fabric.
Looking at printed fabric, there is a right-side, which is the printed side, and a wrong-side. The edges of the fabric are called the selvedge. This is woven tightly and is typically cut away when cutting out the pattern.
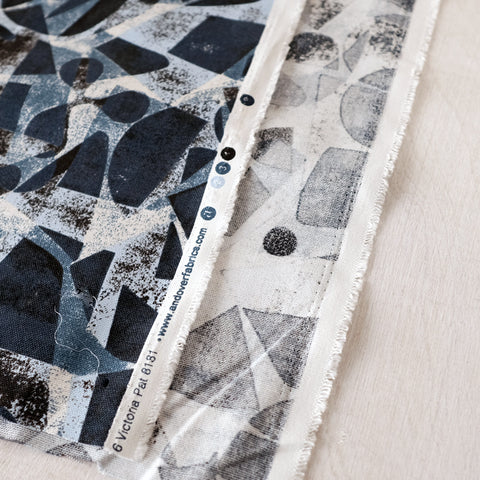
Fold the fabric in half, aligning the selvedges, with right-sides together.
The grainline runs parallel to the selvedge. Since the arrow indicating the grainline runs from the top of the tote bag pattern to the bottom, this means that you will place your paper pattern parallel to the selvedge.
Pin the pattern through both pieces of fabric. Using your fabric scissors, cut through both pieces of fabric at once. Cut as closely to the paper pattern as possible, without cutting the paper.
Where the marks are along the top-edge of the tote (to indicate strap placement), make a snip with your fabric scissors. This is called a notch.

Take out the pins. And set the paper aside. You now have the front and back pieces of your tote bag.

Pin, right sides together, the two pieces of fabric to each other along the left side, the right side, and the bottom. Do not pin or sew along the top of tote bag.
Optional step: For the ease of class, we do not finish the raw edges of the tote bag. Though, going forward, it is a good idea to finish your raw edges so they do unravel. You can do this by using pinking shears, by using a zigzag stitch on your machine, applying French seams, or a by using a serger.
Now it is time to sew your tote bag! Take out your sewing machine. (If you have never used your sewing machine before, or a sewing machine before, take a few moments to google the name of your sewing machine and Youtube, where there are hundreds of videos on how-to use a sewing machine.)

The seam allowance on this pattern is ½ inch. This means you will stitch ½ inch from the cut edge of the fabric. I find it helpful to take a piece of painters tape (in this case I used a black piece of tape, you could use any low-adhesive tape) and to measure from the point at which my needle enters the fabric to the left 1/2", and place the piece of tape at this measurement. This makes it easy to see where my fabric should be when sewing in order to accomplish a 1/2 seam allowance.
Align your fabric with this mark, and start sewing around the sides and bottom of the tote bag. DO NOT sew along the squares at the bottom left-and right- hand corners (see photo below). Stop and remove pins as you come to them. Most machines have a button you can press which makes the machine sew backwards. This is called back-tacking. At the beginning and end of your sewing, you want to back-tack a few stitches. Do this to reinforce your stitching.

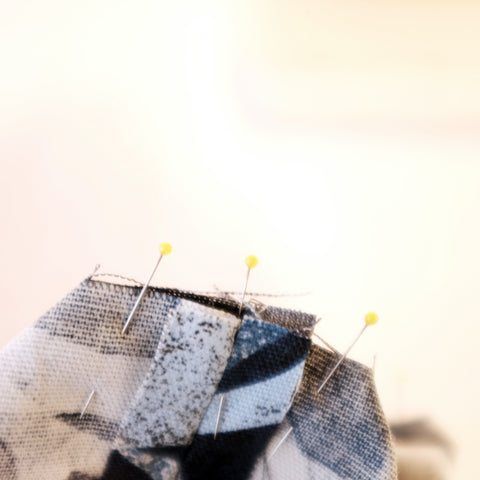
Now, we need to sew those cut squares closed. To do this, open the bag, and pinch the seams together. As shown below:

Then, aligning the center of each seam, pin through both layers. And sew, 1/2" away form the raw edge.
Now, the bottom of the bag is completely sewn.

Next, complete the top of your tote bag. Press seams along the sides open. Cut straps so each measures 27”.
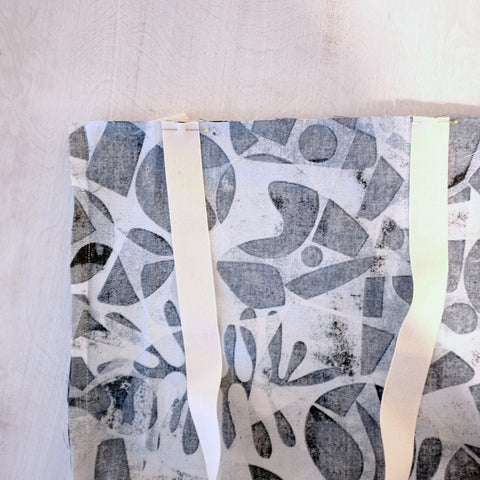
Align straps at so they are placed on the outside of the notch. Pin. Make sure the straps do not have a twist in them.

To complete the top of the tote bag, though the strap and tote bag fabric are separate, treat them as if they are one, always folding them together.
Fold at first fold line on pattern. Press. Fold again, at next fold line. Press. Gently reach under and remove the pin holding the strap in. Fold back the fabric and strap into place. Fold the strap up towards the top of the bag. Then pin as seen in this photo. Repeat for the three other spots where the strap is attached to the bag.

In the next step, sew the straps to the bag and sew the folds closed. First, sew as closely as possible to the top of the bag, through the two layers of fabric and the strap. Sew all away around the bag. Do the same, sewing along as closely as possible to the bottom of the fold.

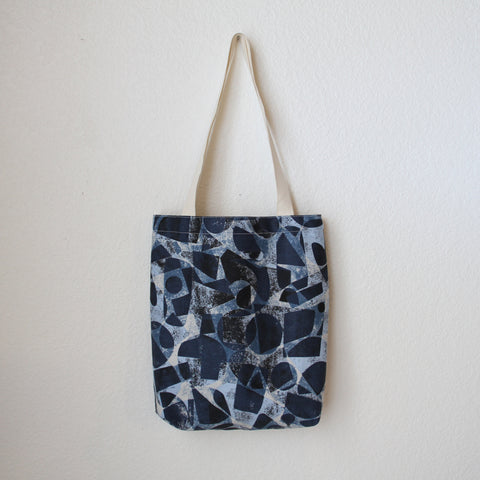
This is how the folded strap will look like once sewn. Snip all the threads, Turn the tote bag right-side out - and voila! You have a completed tote bag. Easy, right?

Want more in-depth instructions and to be more thoroughly introduced to your sewing machine? Take our Sewing 101 class with Tasa Gleason. Go here to learn more.