• Cart: 0 items
  • Home
  • Shop Online
    • Journeys in Natural Dyeing Pop-Up Shop
    • New!
    • Books, DVDs, + Magazines
    • Classes + Special Events
    • Clubs
    • Embroidery
    • Fabric
    • Fiber
    • Gifts + Gift Certificate
    • Kits
    • Natural Dyeing
    • Sewing Patterns
    • Tools / Project Bags
    • Yarn
  • Holiday Gifts
  • Ideology
    • About Us
    • Studio/Process
    • Mission Statement
    • Community Guidelines
  • Podcast
  • Blog

The Modern Natural Dyer Work-Along: Indigo Reveal

Posted by AVFKW Staff on June 15, 2016 3 Comments

The most-anticipated moment with shibori and indigo dyeing is the moment you remove the object creating your resist (binding, stitching, clamps, etc), and reveal the design underneath! With indigo dyeing this is especially fun, with the strong contrast between your dark blue and white underneath.

On Tuesday, Lis and I dipped our pieces in the indigo vat. The night before, I finished stitching the fishbone pattern onto my completed Tendril Tank (above), and Lis's fabric was stitched and pulled tight. We soaked our pieces in hot water to thoroughly wet them, so that the indigo could easily permeate the fabric. Then we re-calibrated the AVFKW indigo vat and started dyeing!

I dipped my piece a total of 5 times; Lis dipped her fabric 3 times. It was a beautiful day in Oakland, with a bright, warm sun. We alternated dips between our two pieces to allow them to fully oxidize.

After our dipping was completed, we gave each piece a quick rinse, then carefully began cutting our knots and removing each thread. 

Lis's fabric turned out beautiful! Since part of it is solid blue, this means only part of her tank will have her stitch pattern, the rest will be solid blue. And since the Tendril is cut on the bias, her stitching pattern will also be on the bias. 

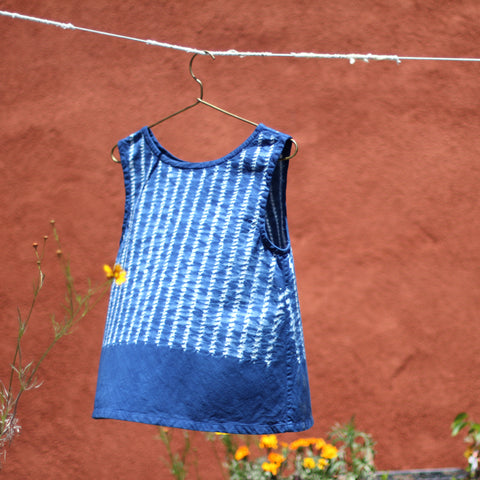
My Tendril Tank is complete, and I love it! Since I used a cotton fabric that is a little heavier than the linen in the Fishbone Dress project, the gathering of the fabric between the stitching lines created an additional resist. I did my best to allow as much dye as possible into this area, but I love the additional patterning that it created.

I'm looking forward to seeing what YOU create with indigo this month! Please feel free to leave us a comment with a link to photos of your work, or use the hashtag #themodernnaturaldyerworkalong on Instagram.

Indigo tips:

+ Make sure the dye reaches all parts of your fabric - i.e. in between the rows of stitching on your Fishbone Dress. 
+ Make sure to allow the indigo on your fabric to fully oxidize in between dips. It can be helpful to dye multiple pieces, one after another, to space out the dips. Grab a friend to join you!
+ Just like with other dyes, your fabric will be several shades lighter after drying, so be sure to keep that in mind as you dip your fabric.
+ Watch Kristine's Creativebug video on dyeing with indigo to learn more.
+ Embrace the variation and natural beauty of your dyed piece!

-- Sarah

Previous Post Next Post

Comments (3 Comments)

Posted by Holly on June 17, 2016

Wonderful works! Thanks for sharing.

Posted by Hannah Todd on June 17, 2016

This is so beautiful and inspiring!

Posted by Lisa on June 16, 2016

Wow, looks great! So you sewed the tank before you did the dyeing, and she dyed her fabric first before sewing. How do you decide which to do? I was just thinking about this the other day.

Post Comment


How much is:
Answer:*

Recent Blog Posts

  • Changing Pioneer to Horizon
  • Posted on August 21, 2019
  • In the Dye Studio: AVFKW Gather Yarn
  • Posted on October 18, 2018
  • Pro-Verbial Club: Nancy Marchant
  • Posted on October 15, 2018
  • AVFKW Dye Day Cocktail Recipe with Thea Colman
  • Posted on August 19, 2018
  • In the Dye Studio: The Indigo + Shibori Dye Kit
  • Posted on August 12, 2018
  • In the Dye Studio: How to Host a Natural Dyeing Party (Part 2)
  • Posted on August 07, 2018
  • In the Dye Studio: How to Host a Natural Dyeing Party (Part 1)
  • Posted on August 06, 2018
  • Stitch Exchange: The Twigs Sweater + AVFKW Flock Yarn
  • Posted on May 10, 2018
  • Stitch Exchange: Papa Sweater + Horizon Yarn
  • Posted on March 15, 2018
  • Sewing 101: Make a Tote Bag
  • Posted on December 10, 2017

Blog Tags

  • alabama chanin
  • american made
  • avfkw
  • boro
  • brooklyn tweed
  • California Wool Project
  • design by romi
  • dye garden
  • dyeing
  • Fabric
  • felting
  • Flock
  • Flowers at My Fingertips Sewing Kit
  • foraging
  • In the Dye Studio
  • indigo
  • knitting
  • Montana
  • mushroom
  • natural dyeing
  • northwoods hat
  • oakland
  • organic
  • Out & About
  • pattern
  • Pressed Seam
  • pro-verbial club
  • proverbial
  • quilting
  • quince & co
  • sandstone shawl
  • sashiko
  • Seam Allowance
  • sewing
  • sock hop
  • special event
  • spinning
  • Stitch Exchange
  • stitches west
  • stowe bag
  • Tasa
  • textile byways
  • The Field and Forest Dress
  • the modern natual dyer work-along
  • the modern natural dyer
  • up and coming
  • visible mending
  • wanderlust bag
  • weaving
  • wool
  • writing
  • yarn

Newsletter Shipping + Curbside Pickup Add-to-Order Special Discounts Return Policies Press Stockists

6328 San Pablo Avenue, Oakland, California 94608
510.595.8372 - info@averbforkeepingwarm.com
Tues - Sat 11am - 3pm, Sun & Mon Closed

Copyright © 2021 A Verb for Keeping Warm.