
This Fall, the Bay Area has been exceptionally warm with only a few days here and there to wear a heavy wool sweater. So, pretty much the first thing I did when deciding to visit Montana was to think about what warm and woolly things I would get to wear. My good friend Julie has a vast collection of hand-knit sweaters. She kindly allowed me to bring along Nieve knit in Horizon.

Stephen had given me a long-term loan of his Iberian Discovery. I felt it was time to knit my own. So I cast-on using Horizon in Grizzly Peak.


And then Tasa, Verb's pattern drafter and sewing teacher, and I got to talking. The Uptown Top is Tasa's personal favorite of the Verb sewing patterns. She has at least 4 variations that she has made for herself! She has one as the pattern is written, one without the hip band but with a vintage lace inset, one out of Alabama Chanin organic cotton jersey, and one out of a delicious wool jersey. She loves this pattern. And when she has a pattern that she loves she finds ways to alter it and expand on it.
So let me introduce to you the Uptown Jacket! From here, Tasa is going to step in and tell you a little bit about how she transformed the Uptown Top into this amazing jacket.
--------------------------------

We had already started talking about hacking this pattern into a jacket when Kristine got the news about Sweet Grass and started planning her trip to Montana. I don't know about you guys, but my wardrobe is the next thing I start thinking of when I have my travel dates! So when Kristine said she would like to take the jacket on her trip north I grabbed some of the amazing Pendleton washable shirt weight wool we have in the store and went to work.

I knew I wanted this to be a pretty accessible pattern hack because we wanted to structure a class around it later. The silhouette of this garment is already perfectly suited to be a jacket. It's simple, loose in the arms and torso so you can wear anything under it, and fitted at the hip so the jacket won't get in the way of movement. So I really didn't have to play with anything besides the front pieces.
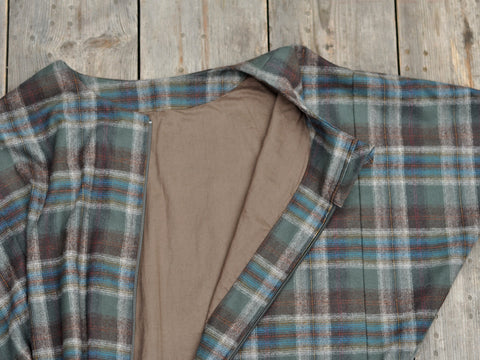
The first thing I did was to split the front panel of the shirt down the center. Then I drafted a facing piece for the new front neckline/center front opening.
An important part of the process was pattern matching the plaid when I was cutting out all the pieces for the shell of the jacket. Pattern matching is something that beginning sewists are often overwhelmed (dare I say frightened?) by, but its bark is much worse than its bite, I promise! It's more time consuming than hard, and the extra time is well worth it if you are working with plaids or stripes. It can really elevate your garment to the next level to have things line up nicely.

After cutting out my shell pieces, I moved on to the lining. I used a solid color cotton voile for the lining. It's a really tight weave so despite the fact that it's thin it should hold up fine as a lining fabric. It's also nice and smooth which is the other main consideration for a lining fabric, you don't want your jacket to stick to whatever you are wearing under it! Also I snuck a patch pocket on the inside of the jacket, because pockets are a must have for almost every garment.
The assembly for the jacket is basically the same as it is for the top, except you are making two instead of one and then connecting them at the arm openings, neck opening, hip band and center front. The only other thing I really altered was to cut a deeper hip band out of the wool and fold it over, as opposed to lining it with the voile. I think it will make a sturdier hip band and hold up better over the life of the jacket. Installing the separating zipper is the final step for this jacket.
I love how this pattern hack turned out. It works great as an extra layer in the temperate Bay Area climate and I plan on making one for myself in the very near future. The hardest part is picking which lovely fabric to make it out of!
I hope you enjoyed the pictures and that this project inspires you to re-envision one of your favorite pattens!
Happy sewing!
Tasa
-------
I am very grateful to Tasa for making this incredible jacket. If you would like to learn how to make your own, Tasa is teaching a class. Click here to learn more.
I hope you are having a wonderful Fall season. Thanks for reading!
Kristine